Weather station based on ESP32 and MicroPython
In one of the previous posts I briefly described sending data to Google Sheets from a ESP32 board using MicroPython. As I mentioned earlier, the code is available on GitHub. Here are the main features:
- Measuring temperature and humidity with a DHT22 sensor.
- Sending data to a Google Sheet.
- Authentication via Google OAuth 2.0 service to get access to the sheet.
- Configuring the device via a web browser.
The Google Sheet doesn’t need to be publicly available on the Internet. The device doesn’t require any middleman such as PushingBox or IFTTT.
In this post, let’s focus a bit on technical details.
Hardware components
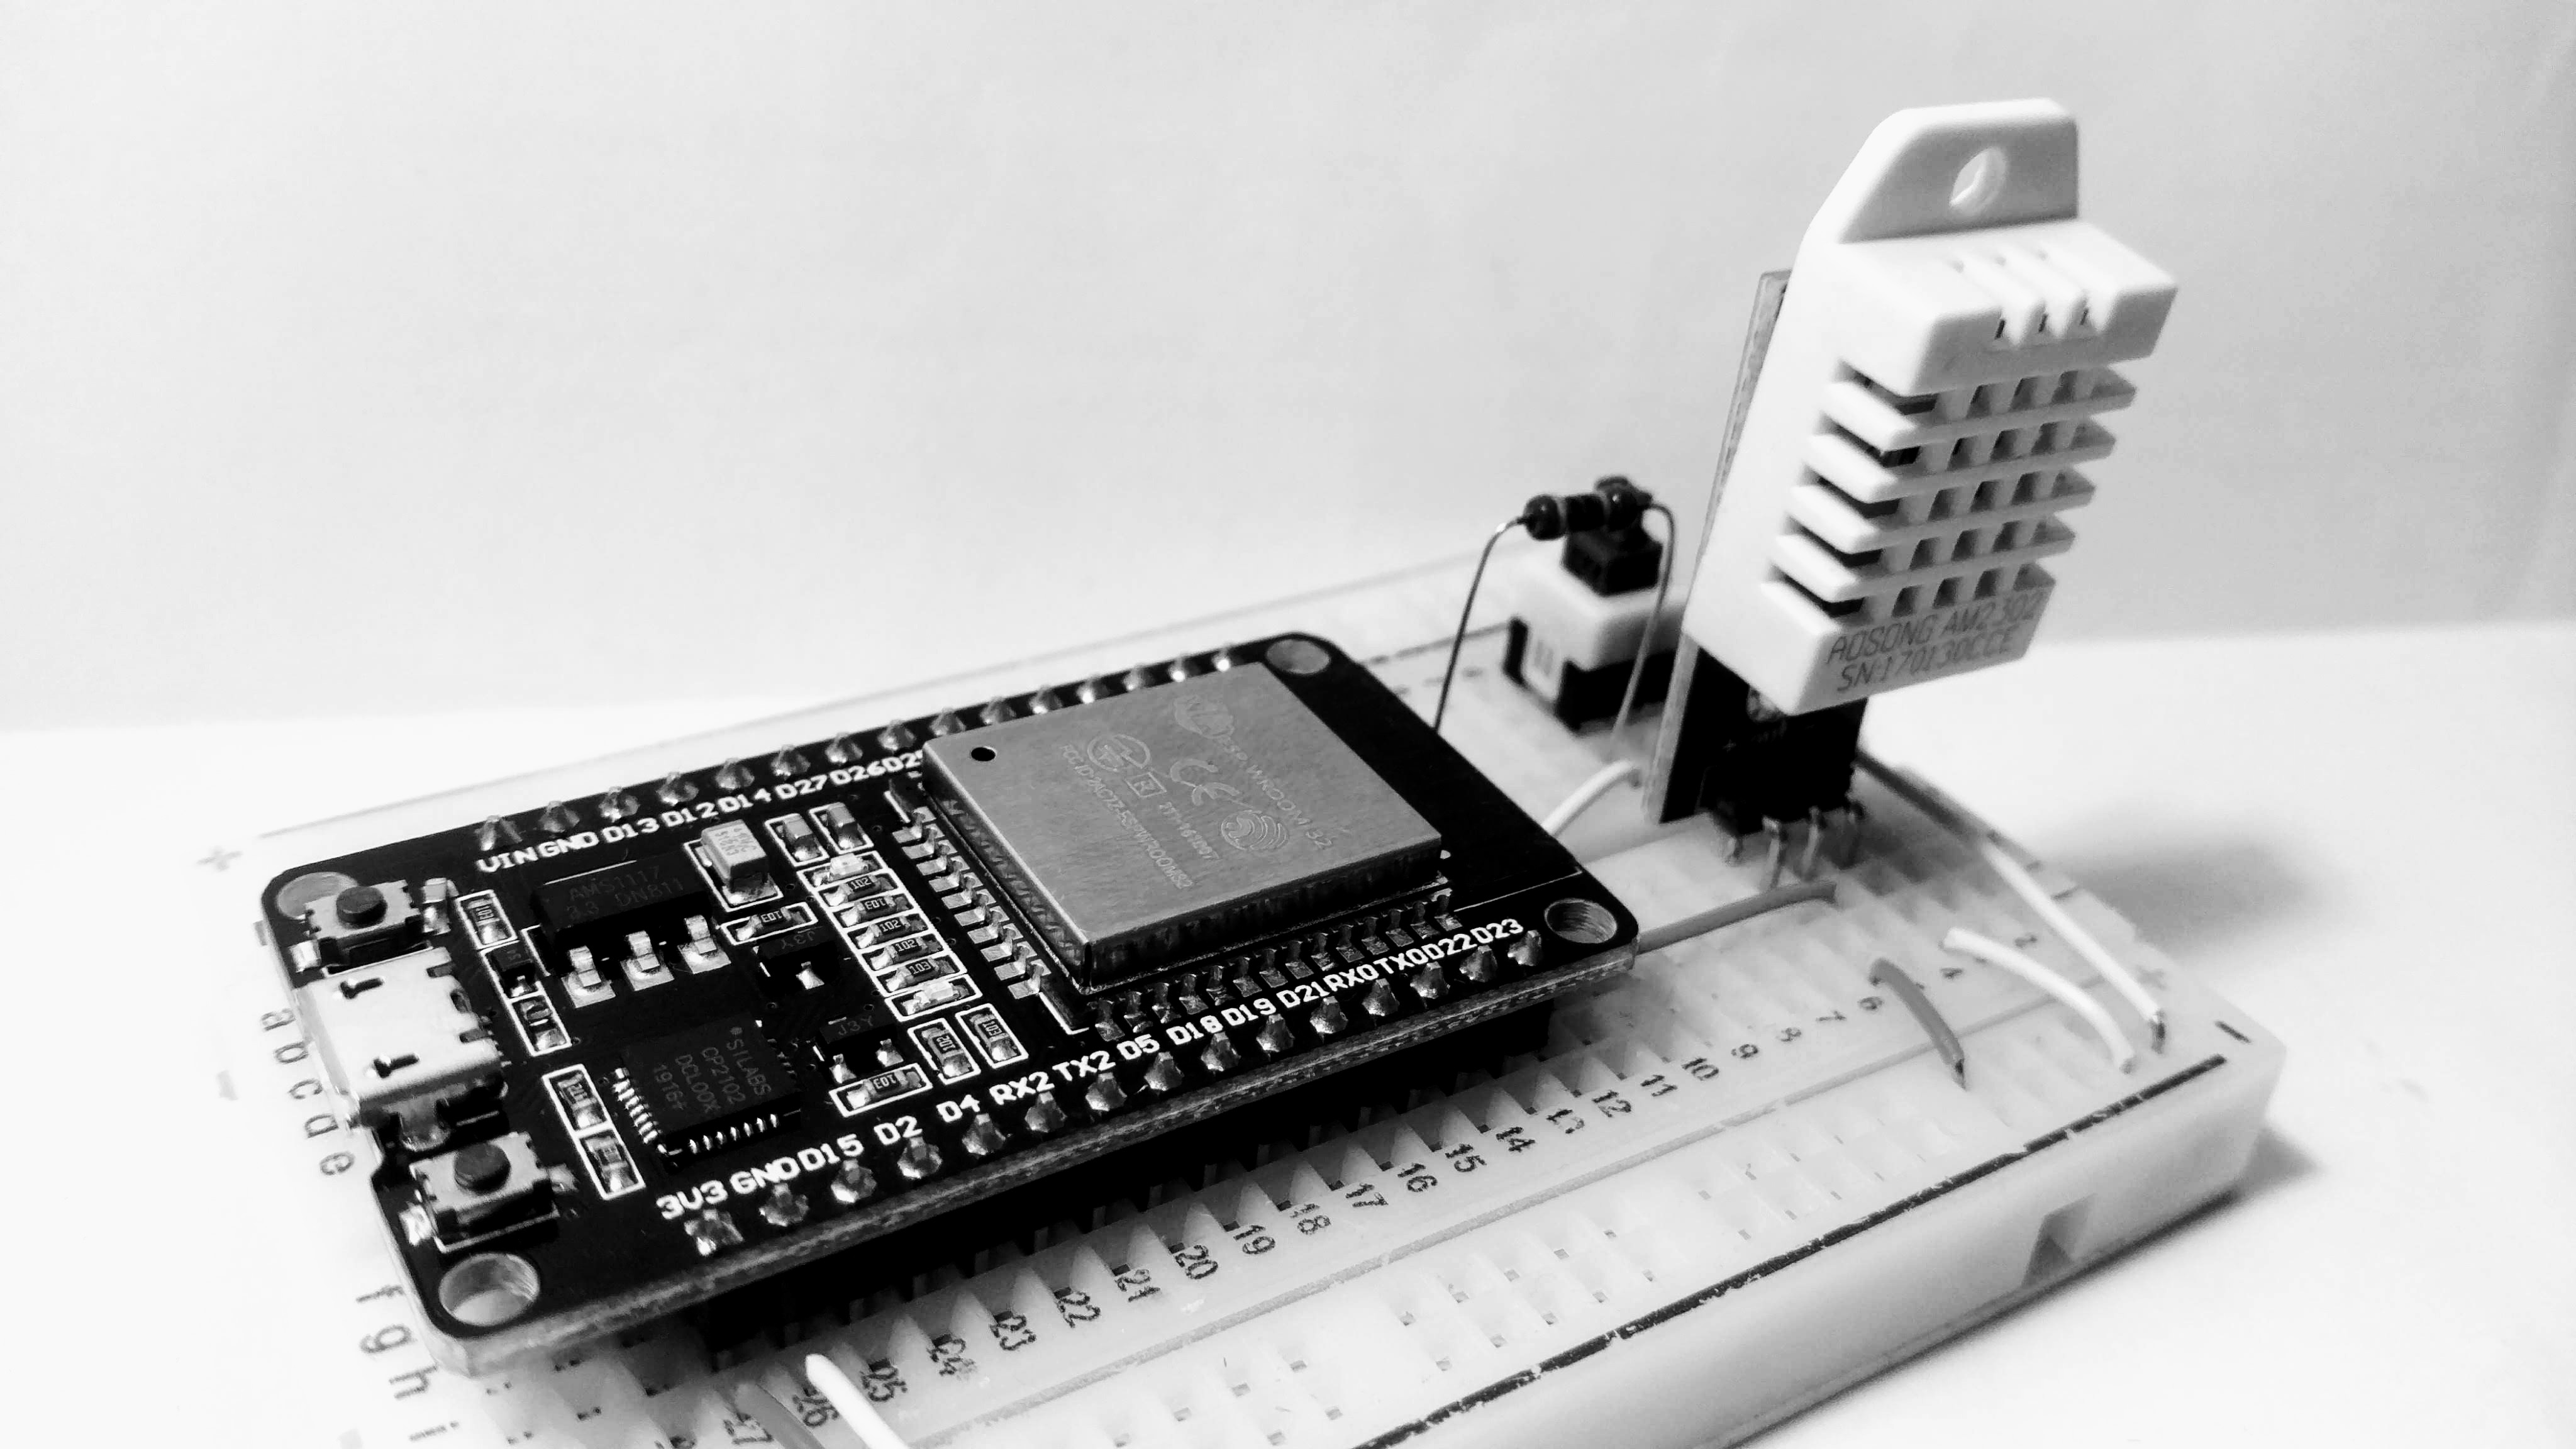
The device is based on an ESP32 board. For the sake of simplicity, let’s use an ESP32 development board and a mini breadboard. Here is a full list of components:
- ESP32 development board
- Breadboard
- DHT22 sensor
- Switch
- Resistor 10 KOhm
- Resistor 22 KOhm
We’ll also need a USB cable for communicating to the board, and also some wires. Normally, most of the ESP32 development boards don’t require an additional power supply. It can be just powered by USB. That’s pretty much it.
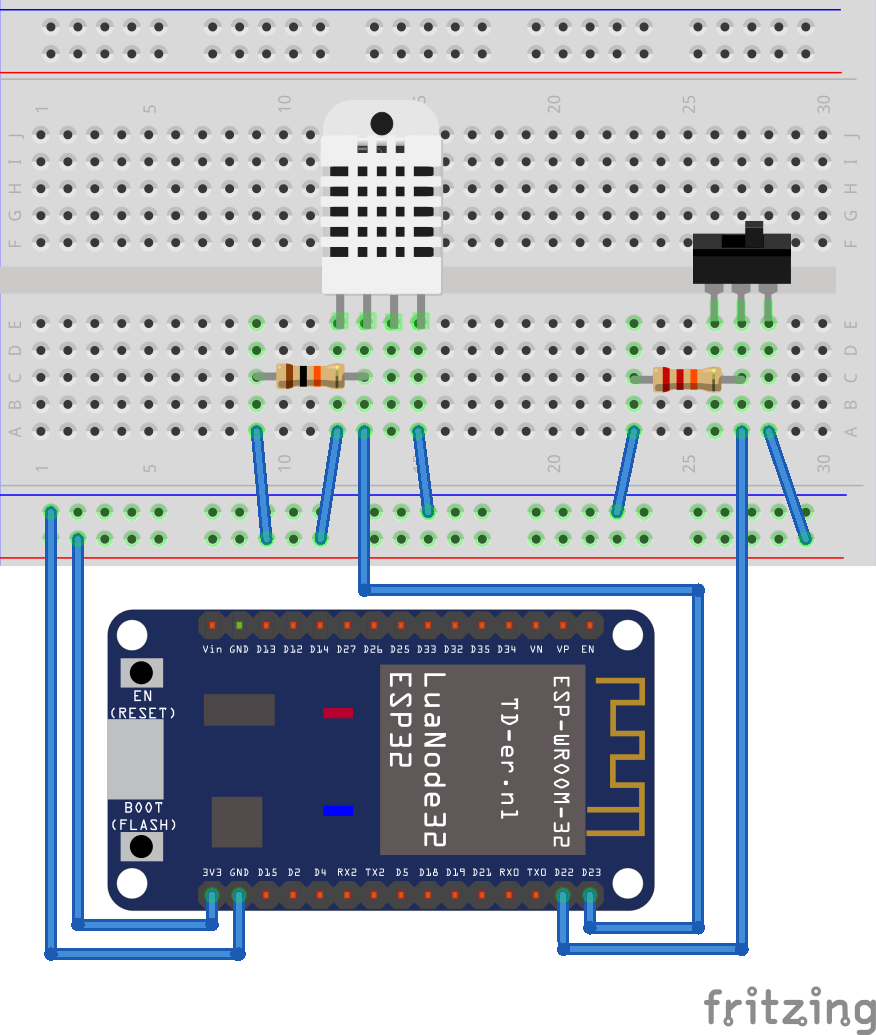
Circuit
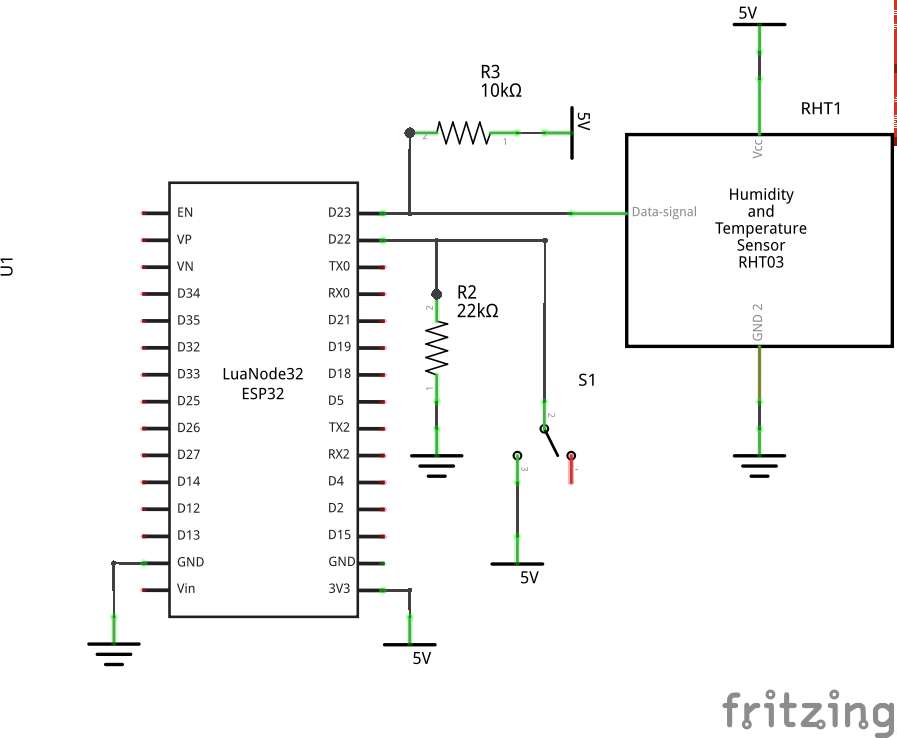
The circuit is pretty simple. We can see that the DHT22 sensor is connected to the D23 pin of the ESP32 board. R3 is a pull-up resistor. Note that your DHT22 sensor may already have a pull-up resistor, so that you don’t need to add the resistor R3 (for example, DHT22 sensors from most of the sensor kits already have it). The switch S1 is used to turn on the configuration mode. In this mode, the device sets up a Wi-Fi access point, and starts a web server that offers to update the device’s configuration.
Here is a breadboard view:
Project structure
The code repository can be cloned as usual with the git clone command below. Note that you’ll need to checkout the version 1.0.0 because the master branch contains further updates and improvements that are not covered in this post (feel free to check them out as well!).
git clone https://github.com/artem-smotrakov/esp32-weather-google-sheets
cd esp32-weather-google-sheets
git checkout 1.0.0
The source code is located in the src directory:
src/config.pycontains aConfigclass that holds the device’s configuration.src/main.pyis the main script that runs on the device when it starts.src/ntp.pycontains an NTP client which is based on ntptime.pysrc/settings.pyimplements the configuration mode, it contains a web form for updating the settings and a handler for HTTP requests.src/util.pyprovides several useful functions for rebooting, starting a Wi-Fi access point and so on.src/weather.pyis responsible for measuring temperature and humidity with DHT22 sensor.src/http/server.pyprovides a simple HTTP server.src/google/auth.pyimplement authentication with Google OAuth2 service.src/google/sheets.pyprovides aSpreadsheetclass that allows inserting rows into a Google sheet.src/rsadirectory contains an implementation of RSA signing that is based on the python-rsa package.
Besides the source code, the project also contains for following:
esp32-20190529-v1.11.binis a MicroPython 1.11 firmware. Newer or older versions may also work.main.confholds the device’s configuration which may be edited before uploading the file to the device, or later via the configuration mode.scriptsdirectory provides a number of helpful scripts for flashing the firmware, uploading code and so on.
We’ll also need the following tools:
- esptool for deploying MicroPython to our ESP32 development board
- mpfshell for uploading files to the board.
- minicom for connecting to the board for debugging purposes.
- openssl and python-rsa package for converting cryptographic keys.
- Python3 for running esptool and mpfshell.
The instructions below have been only tested on Ubuntu 16.10.
Google authentication with OAuth2
To write data to a Google sheet, the project calls Google Sheets API. To make a successful call to the API, we need an OAuth2 token provided by the Google OAuth2 service. Let’s discuss how it can be done.
First, we need to create a project and a service account in the Google IAM console. Follow these instructions from Google. Once it’s done you’re going to have an email for your service account like your-service-account@your-project.iam.gserviceaccount.com. Then, we need to create a key for the service account. Download the key and save it to google_key.json file in the root of the project.
The downloaded key is an RSA private key. The key is used by a ServiceAccount class from src/google/auth.py to obtain an OAuth2 token from Google OAuth2 service. The ServiceAccount.token() method calls JWTBuilder.build() which builds a JWT and signs it with the private key. The JWTBuilder class needs the current time to put it to the JWT. The class uses an NTP client to get the current time:
def build(self):
    time = ntp.time()
    print('jwt: time: %d' % time)
    self._claim['iat'] = time
    self._claim['exp'] = time + self._expiration
    encoded_header = encode_dict_to_base64(self._header)
    encoded_claim = encode_dict_to_base64(self._claim)
    to_be_signed = '%s.%s' % (encoded_header, encoded_claim)
    signature = pkcs1.sign(to_be_signed.encode('utf8'), self._key, 'SHA-256')
    encoded_signature = encode_bytes_to_safe_base64(signature)
    return '%s.%s' % (to_be_signed, encoded_signature)
The ServiceAccount class then sends the JWT to the Google OAuth2 Authorization Server which returns a token for accessing Sheets API.
def token(self):
    builder = JWTBuilder()
    builder.service_account(self._email)
    builder.scope(self._scope)
    builder.key(self._key)
    jwt = builder.build()
    type = 'urn%3Aietf%3Aparams%3Aoauth%3Agrant-type%3Ajwt-bearer'
    body = 'grant_type=%s&assertion=%s' % (type, jwt)
    headers = {'Content-Type': 'application/x-www-form-urlencoded'}
    response = requests.post('https://www.googleapis.com/oauth2/v4/token',
                             data=body,
                             headers=headers)
    if not response:
        print('token: no response received')

    return response.json()['access_token']
The JWTBuilder class uses an implementation of RSA algorithm from the src/rsa directory which contains a truncated version of the python-rsa package adapted for MicroPython for ESP32. This implementation supports only RSA signing. Unfortunately, it doesn’t even support loading RSA keys from PKCS1 since it would require porting the pyasn1 package to ESP32 which may be too big for tiny ESP32 microcontrollers. Instead, the truncated RSA implementation can load a private key from a JSON file that contains q, e, d, p and n numbers. Therefore, the downloaded keys need to be converted to the format which is recognized by the truncated RSA implementation. It can be done with scripts/extract_key.sh script:
cd scripts
sh extract_key.sh ../google_key.json ../key.json
The key.json file needs to be put to the device which is described below. The original key and key.json file should be kept in secret.
Creating a Google sheet
It’s time to create and configure a Google sheet which we’ll use to store temperature and humidity. Simply create a new sheet, and then share it with the service account your-service-account@your-project.iam.gserviceaccount.com which was created earlier. The sheet doesn’t need to be publicly available on the Internet. In the near future, we’ll need an ID of the created sheet. The ID looks like a hash, and can be found in the URL of the sheet:
https://docs.google.com/spreadsheets/d/${sheet_id}/edit#gid=0
Calling Google Sheets API
src/google/sheet.py contains the Spreadsheet class which calls the following Sheets API endpoint to insert a row to the specified Google sheet:
https://sheets.googleapis.com/v4/spreadsheets/${sheet_id}/values/${range}:append?insertDataOption=INSERT_ROWS&valueInputOption=RAW
A row contains three values:
- Column
Acontains a current timestamp which is obtained from an NTP server. - Column
Bcontains temperature. - Column
Ccontains humidity.
The class is configured with an instance of ServiceAccount which provides an OAuth2 token for accessing the Google Sheets API.
Configuring the device
The main.conf file holds a configuration for the device. It’s just a JSON file that looks like the following:
{
   "error_handling": "ignore",
   "ssid": "",
   "password": "",
   "config_mode_switch_pin": 22,
   "dht22_pin": 23,
   "measurement_interval": "1h",
   "google_service_account_email": "",
   "google_sheet_id": ""
 }
The configuration is loaded by Config class from src/config.py. Let’s discuss what the parameters above mean.
error_handling defines how the device handles errors that may occur in the main loop at the end of src/main.py. The parameter can be set to ignore, reboot or stop. If error_handling is set to reboot, then the device is going to reboot if an exception was thrown. If the parameter is set to stop, then the device is going to exit from the main loop and stop. If the parameter is set to ignore, then all exceptions are going to be ignored and the main loop should never stop. Exceptions may occur due to various reasons. For example, networking issues, some intermittent problems in our code or MicroPython libraries. The ignore value sounds like the best choice if we want the device to be fault-tolerant. The default value for error_handling parameter is ignore.
The ssid and password parameter contains SSID and password for a Wi-Fi network.
The config_mode_switch_pin and dht22_pin parameters contain pin numbers that are used to connect the DHT22 sensor and the switch S1.
The measurement_interval interval parameter defines how often the device should measure temperature and humidity. The format is Xh Ym Zs. For example, 1h 2m 3s means one hour two minutes and three seconds.
The google_service_account_email and google_sheet_id defines a services account email and an ID of a spreadsheet.
There are two ways to configure the device. The first way is to edit the main.conf file before uploading it to the device which is discussed below. The second way is to use the configuration mode. Once the code is uploaded to the device, we can press the S1 switch which reboots the device and turn on the configuration mode. In this mode, the device starts a Wi-Fi access point which is called esp32-weather-google-sheets. The password is helloesp32. The device then runs an HTTP server on http://192.168.4.1/ which provides a web form to set the parameters described above.
Bringing all together
The main.py brings all the components together. First, it loads configuration from main.conf. Next, it creates an instance of the ServiceAccount class that is going to be used to obtain an OAuth2 token for writing data to a sheet. Then, it creates an instance of the Spreadsheet class that is used to write data to the sheet. And finally, it initializes the DHT22 sensor.
sa = ServiceAccount()
sa.email(config.get('google_service_account_email'))
sa.scope('https://www.googleapis.com/auth/spreadsheets')
sa.private_rsa_key(config.private_rsa_key())

spreadsheet = Spreadsheet()
spreadsheet.set_service_account(sa)
spreadsheet.set_id(config.get('google_sheet_id'))
spreadsheet.set_range('A:A')

weather = Weather(config.get('dht22_pin'),
                  config.get('measurement_interval'),
                  weather_handler)
Then, main.py creates a handler that takes temperature and humidity and writes them to a sheet.
class WeatherHandler:

    def __init__ (self, spreadsheet):
        self.spreadsheet = spreadsheet

    def handle(self, t, h):
        print('temperature = %.2f' % t)
        print('humidity = %.2f' % h)
        spreadsheet.append_values([t, h])

weather_handler = WeatherHandler(spreadsheet)
Next, it initializes a switch that turns on the configuration mode. When the switch changes its state, the board reboots immediately and starts an access point with an HTTP server. If the configuration mode is disabled, the device tries to connect to Wi-Fi.
config_mode_switch = Pin(config.get('config_mode_switch_pin'), Pin.IN)
config_mode_switch.irq(lambda pin: util.reboot())

if config_mode_switch.value() == 1:
    from http.server import HttpServer
    from settings import ConnectionHandler
    print('enabled configuration mode')
    access_point = util.start_access_point(ACCESS_POINT_SSID, ACCESS_POINT_PASSWORD)
    handler = ConnectionHandler(config)
    ip = access_point.ifconfig()[0]
    HttpServer(ip, 80, handler).start()
    util.reboot()

util.connect_to_wifi(config.get('ssid'), config.get('password'))
In the end, the main.py starts the main loop which calls checks if it’s time to measure temperature and humidity, and handles exceptions according to the specified error handling strategy.
while True:
    try:
        weather.check()
    except:
        if config.get('error_handling') == 'reboot':
            print('achtung! something wrong happened! rebooting ...')
            util.reboot()
        elif config.get('error_handling') == 'stop':
            raise
        else:
            print('achtung! something wrong happened! but ignoring ...')

    time.sleep(1) # in seconds
Deploying MicroPython to ESP32
First, we need to erase the entire flash of the device before deploying the new MicroPython firmware. It can be done with a command like the following, or just run script/erase.sh:
esptool.py --chip esp32 --port /dev/ttyUSB0 erase_flash
The command above is going to print out something like the following:
esptool.py v2.6
 Serial port /dev/ttyUSB0
 Connecting….
 Chip is ESP32D0WDQ6 (revision 1)
 Features: WiFi, BT, Dual Core, 240MHz, VRef calibration in efuse, Coding Scheme None
 MAC: a4:cf:12:05:ba:48
 Uploading stub…
 Running stub…
 Stub running…
 Erasing flash (this may take a while)…
 Chip erase completed successfully in 7.4s
 Hard resetting via RTS pin…
Note that before erasing, flashing or verifying firmware, the board may need to be switched to the flash mode. It can be normally done by pressing the RST button while holding the EN button. However, some ESP32 devices allow deploying firmware without pressing any button on the board which is quite convenient.
esptool may require root access, so you may need to run the command above with sudo. Or, you can add your user to dialout group. The details can be found here.
Then, we can deploy MicroPython firmware to our ESP32 board. Run the command like below, or just call scripts/flash.sh:
esptool.py \
     --chip esp32 \
     --port /dev/ttyUSB0 \
     --baud 460800 \
     write_flash -z 0x1000 esp32-20190529-v1.11.bin
In case of successful deployment, it’s going to print out something like that:
esptool.py v2.6
 Serial port /dev/ttyUSB0
 Connecting….
 Chip is ESP32D0WDQ6 (revision 1)
 Features: WiFi, BT, Dual Core, 240MHz, VRef calibration in efuse, Coding Scheme None
 MAC: a4:cf:12:05:ba:48
 Uploading stub…
 Running stub…
 Stub running…
 Changing baud rate to 460800
 Changed.
 Configuring flash size…
 Auto-detected Flash size: 4MB
 Compressed 1146864 bytes to 717504…
 Wrote 1146864 bytes (717504 compressed) at 0x00001000 in 16.6 seconds (effective 552.7 kbit/s)…
 Hash of data verified.
 Leaving…
 Hard resetting via RTS pin…
To make sure everything went well, the deployed firmware can be verified with the following command which is also available in script/verify.sh:
esptool.py \
    --chip esp32 \
    --port /dev/ttyUSB0 \
    --baud 460800 \
    verify_flash 0x1000 esp32-20190529-v1.11.bin
If the verification succeeds, the output is going to look like the following:
esptool.py v2.6
 Serial port /dev/ttyUSB0
 Connecting….
 Chip is ESP32D0WDQ6 (revision 1)
 Features: WiFi, BT, Dual Core, 240MHz, VRef calibration in efuse, Coding Scheme None
 MAC: a4:cf:12:05:ba:48
 Uploading stub…
 Running stub…
 Stub running…
 Changing baud rate to 460800
 Changed.
 Configuring flash size…
 Auto-detected Flash size: 4MB
 Verifying 0x117ff0 (1146864) bytes @ 0x00001000 in flash against esp32-20190529-v1.11.bin…
 -- verify OK (digest matched)
 Hard resetting via RTS pin…
Uploading code to ESP32
Once we have MicroPython on our ESP32 board, we can upload the code. There are several ways to do that, but we’re going to use mpfshell. The following command uploads the code from the src directory, the private RSA key and main.conf to the board:
mpfshell \
     -n -c \
     "open ttyUSB0; put main.conf; put key.json; \
     lcd src; mput .*\_.py; \__md rsa; cd rsa; lcd rsa; mput ._*\.py; \
     cd ..; md google; cd google; lcd ..; lcd google; mput .*\.py"
It can also be done by calling scripts/upload.sh. If everything goes well, mpfshell is going to print something like the following:
Connected to esp32
 put util.py
 put weather.py
 put ntp.py
 put config.py
 put settings.py
 put main.py
 put machine_size.py
 put __init__.py
 put transform.py
 put _compat.py
 put core.py
 put pkcs1.py
 put common.py
 put key.py
 put __init__.py
 put client.py
 put core.py
 put server.py
 put auth.py
 put __init__.py
 put sheet.py
Conclusion
In this project, Google Sheets are used as a simple database to store temperature and humidity. The data can be easily accessed and shared with others, furthermore, we can draw charts and perform basic data analysis using features of Google Spreadsheets.
This is a pretty simple weather station, and there is room for improvement. The project uses only two pins of ESP32 but the chip provides many more which can be used to add more features to the device. For example, here is a couple of sensors that may extend this simple weather station:
- BMP280 barometric pressure sensor
- MH-Z19 CO2 sensor (see this follow-up post)
Other pins can be used to control other devices. For example, the weather station can open a window and turn on a ventilator when CO2 level is high, or it can turn on an AC when it’s getting too hot.
UPDATE: It turned out that mpfshell may not work well on Windows. ampy may be a better option. Thanks Dave for reporting this!