Sending text commands to STM32 with USART
If you think that your STM32 board feels lonely, you can connect it to your laptop. One of the ways how you can do that is USART. That’s probably the easiest way. For example, let’s say that we want to send text commands from a laptop to STM32 board. One command should turn on an LED, and another one should turn it off. And of course, STM32 should curse us in case of invalid command.
I used a template project for STM32 which I have described earlier. Everything that I described in that post applies here (same components, same software, same commands). But source code became a little bit more complicated:
https://github.com/artem-smotrakov/stm32f103-usb-commands
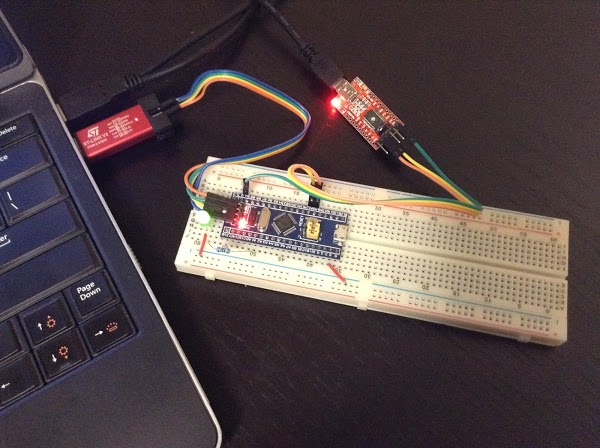
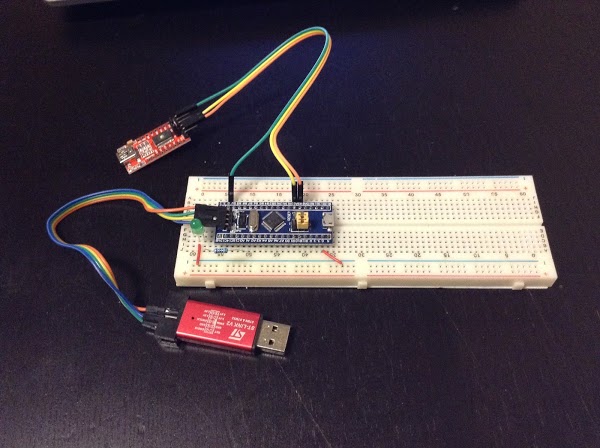
Hardware: STM32F103, ST-LINK/V2 and USB-Serial adapter
Here is a list of components we need:
- STM32F103 board (I used this one which is based on STM32F103C8T6 microcontroller).
- An LED of your favorite color, and a resistor (200 or 330 Ohms should be fine). Here is another post which describes how to select a current limiting resistor.
- ST-LINK/V2 debugger/programmer.
- USB-Serial adapter. I used this one which is based on FT232RL (but you can use any other adapter).
As I described in my previous post, I connected an LED to PA1 pin. Then, we need to connect an USB-Serial adapter to STM32. According to datasheet for STM32F103, PA9 and PA10 pins can be configured for USART (see page #31 of the datasheet):
- Connect PA9 (TX) pin to RX pin of USB-Serial adapter.
- Connect PA10 (RX) pin to TX pin of USB-Serial adapter.
- Connect GND of STM32 board to GND of USB-Serial adapter.
I hope your laptop has two free USB ports because we need one for ST-LINK/V2, and another one for USB-Serial adapter.
That’s it about hardware.
Software: STM32 and USART
I put the sources on GitHub:
git clone https://github.com/artem-smotrakov/stm32f103-usb-commands
The structure is similar to what I described in my post about template project for SMT32:
Makefileis a Make file for compiling sources and uploading binaries to STM32 board.main.handstm32f10x_conf.hinclude header files that we need, and define a couple of constants.main.ccontains the most interesting part.
Here is what we have in main.c:
init_output()initializes PA1 as an output pin to drive an LED. Then, we can turn it on/off withturn_on_pa1()andturn_off_pa1()functionsusart_init()initializes USART on PA9 and PA10 pins. Then, we can send bytes and strings withusart_send(),usart_send_string(),usart_send_newline()andusart_send_line()functions.USART1_IRQHandler()is a handler for USART data. It receives incoming text commands.handle_command()processes commands which came from USART.get_string_length()returns length of a string, andis_equal()checks if two strings are equal. They are similar tostrlen()andstrcmp()functions. It’s also possible to use newlib which contains those functions, but it would make the project more complicated. So I just quickly addedget_string_length()andis_equal()instead.main()function puts everything together.
This simple project supports only two text commands:
a1 onsets PA1 pin to “1” (turns on LED).a1 offsets PA1 pin to “0” (turns off LED).
The sources can be compiled and uploaded to STM32 board with commands like the following (you need to specify a path to STM32 standard peripheral library):
STD_PERIPH_LIBS=/home/user/libs/STM32F10x_StdPeriph_Lib_V3.5.0 \
    make all
STD_PERIPH_LIBS=/home/user/libs/STM32F10x_StdPeriph_Lib_V3.5.0 \
    make burn
Sending commands to USB-Serial port
If you use Linux, there should be a file in /dev associated with a USB port which you use for USB-Serial adapter. You can use dmesg tool to find it:
dmesg | grep tty
It should print something like the following:
[0.000000] console [tty0] enabled
[5.228613] systemd[1]: Created slice system-getty.slice.
[29158.699946] usb 1-2: FTDI USB Serial Device converter now attached to ttyUSB0
[29869.017886] ftdi_sio ttyUSB0: FTDI USB Serial Device converter now disconnected from ttyUSB0
[29877.238602] usb 1-2: FTDI USB Serial Device converter now attached to ttyUSB0
In my case, I had /dev/ttyUSB0 file. You may need to set 666 access rights to it:
sudo chmod 666 /dev/ttyUSB0
After that you can send data to STM32 by writing to this file, for example:
# turn LED on
echo -e "a1 on\r" > /dev/ttyUSB0
# turn LED off
echo -e "a1 off\r" > /dev/ttyUSB0
Or, you can use your favorite terminal emulation program, for example, Minicon:
sudo apt-get install minicom
sudo minicom -s
The second command above shows a menu where you can configure minicom with proper settings for USB-Serial connection (file name, baud rate, word length, stop bits, parity and flow control). You can find those settings in usart_init() function. Then, it will offer you to save settings, and connect to the device). Or, you can just use the following command:
minicom --device /dev/ttyUSB0
That’s pretty much it. Good luck!