A template project for STM32 on Linux
I am a beginner in electronics and programming for microcontrollers, so traditionally I started from driving an LED which is a ‘Hello World!’ project in microcontrollers world. I started with STM32 controller (STM32F103) which is ARM, and I can use C language.
When my LED finally started blinking, I thought it might be useful from me (and hope I can be useful for someone else) if I create a simple re-usable template project. As a result, now there is one more repository on GitHub.
I use Linux, no fancy GUI, sorry.
Before I started, of course I asked Google how people work with STM32 on Linux. I found two good articles which helped me a lot:
- STM32 Discovery Development On Linux - this article is about STM32F4Discovery which has an ST-LINK/V2 debugger/programmer. But I had only STM32F103 board which is similar, but still a little bit different.
- Programming ARM Cortex (STM32) under GNU/Linux - this one is about STM32F4 as well.
Probably there are articles about STM32F103 on the Internet, but I gave up googling.
STM32, what else?
Let’s talk about hardware.
To be honest, it’s much easier to use some STM32 Discovery board. But it’s so big … Some of these boards even contain an LCD display which is cool but … Is there anything smaller?
Luckily there is a Maple Mini project which is based on STM32 microcontroller. But I found a clone from guys in China … It was only $1.90. I was so happy, so I ordered two. Ah, no free shipping … fine, it’s $4.24 in total. Not too much I guess.
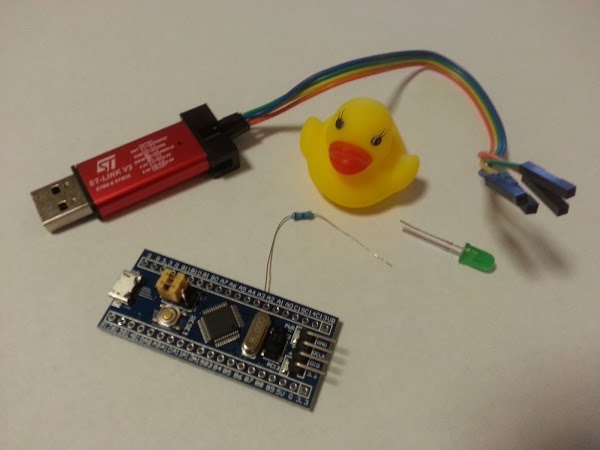
This board is based on STM32F103C8T6, but it doesn’t have a built-in debugger/programmer like STM32F4Discovery. So I needed a programmer then. Guys from China saved me again. I found a clone of ST-LINK/V2 programmer. It was only $3.45. And free shipping, hooray!
I also needed an LED and a resistor. The resistor may be 200 or 330 Ohms. I wrote a separate post about connecting an LED to a microcontroller, and choosing a current limiting resistor.
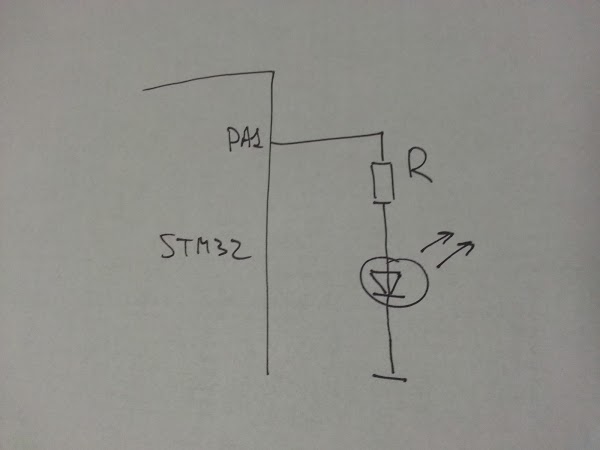
By the way, all stuff arrived in a couple of weeks which I think is pretty fast for AliExpress. But maybe I just was lucky. An LED should be connected to pin PA1.
We need a C compiler for ARM
I used GNU Tools for ARM Embedded Processors toolchain. It can be downloaded here, but I just installed it with apt-get on myUbuntu 16.04:
sudo aptitude install gcc-arm-none-eabi
As a sanity check, you can just print arm-none-eabi-gcc version:
arm-none-eabi-gcc --version
arm-none-eabi-gcc (15:4.9.3+svn227297-1) 4.9.3 20150529 (prerelease)
Copyright (C) 2014 Free Software Foundation, Inc.
This is free software; see the source for copying conditions.  There is NO
warranty; not even for MERCHANTABILITY or FITNESS FOR A PARTICULAR PURPOSE.
We have hardware, compiler, that’s all?
Not really.
I needed STLINK software to upload the code to microcontroller. Sources are available on GitHub. I just cloned the repo, and built it. It needs a couple of tools and libs to install. On Ubuntu 16.04 I did the following:
sudo apt-get install automake autoconf pkg-config libusb-1.0 git
When it’s done, STLINK can be built with the following commands:
git clone https://github.com/texane/stlink.git stlink
cd stlink
./autogen.sh
./configure
make
Can we already start driving an LED?
Yeah, finally.
STMicroelectronics provides STM32 standard peripheral library which contains APIs to work with STM32 microcontrollers. I used version 3.5.0. The library can be downloaded here. Another option is to use STM32Cube which seems to be recommended by STMicroelectronics.
Now we can finally start writing code. As I mentioned earlier, I uploaded the code on GitHub:
git clone https://github.com/artem-smotrakov/stm32f103-template
I wanted to keep it simple, so it doesn’t have much stuff.
main.c is the main program. First, main() function initializes pinPA1. Then, it starts an infinite loop which turns on/off the LED with a delay.
#include "main.h"

void delay(int millis) {
while (millis-- > 0) {
volatile int x = 5971;
while (x-- > 0) {
__asm("nop");
}
}
}

int main(void) {

// GPIO structure for port initialization
GPIO_InitTypeDef GPIO_InitStructure;

// enable clock on APB2
RCC_APB2PeriphClockCmd(RCC_APB2Periph_GPIOA, ENABLE);

// configure port A1 for driving an LED
GPIO_InitStructure.GPIO_Pin = GPIO_Pin_1;
GPIO_InitStructure.GPIO_Mode = GPIO_Mode_Out_PP; // output push-pull mode
GPIO_InitStructure.GPIO_Speed = GPIO_Speed_50MHz; // highest speed
GPIO_Init(GPIOA, &GPIO_InitStructure) ; // initialize port

// main loop
while(1) {
GPIO_SetBits(GPIOA, GPIO_Pin_1); // turn the LED on
delay(DELAY);

GPIO_ResetBits(GPIOA, GPIO_Pin_1); // turn the LED off
delay(DELAY);
}
}
main.h is a header file which includes a couple of other header files from STM32 standard peripheral library.
#ifndef __MAIN_H
#define __MAIN_H

#include <stm32f10x.h>
#include <stm32f10x_gpio.h>
#include <stm32f10x_rcc.h>

#define DELAY 1500 // in millis

#endif
stm32f10x_conf.h is a header file which is used by STM32 standard peripheral library. It contains only assert_param() function which does nothing.
#ifndef __STM32F10x_CONF_H
#define __STM32F10x_CONF_H

// no asserts
#define assert_param(expr) ((void)0)

#endif
Compilation fails without this function with errors like the following:
/home/artem/projects/stm32/src/STM32F10x_StdPeriph_Lib_V3.5.0//Libraries/STM32F10x_StdPeriph_Driver/src/stm32f10x_rcc.c: In function 'RCC_HSEConfig':
/home/artem/projects/stm32/src/STM32F10x_StdPeriph_Lib_V3.5.0//Libraries/STM32F10x_StdPeriph_Driver/src/stm32f10x_rcc.c:273:3: warning: implicit declaration of function 'assert_param' [-Wimplicit-function-declaration]
   assert_param(IS_RCC_HSE(RCC_HSE));
   ^
/home/artem/projects/stm32/src/STM32F10x_StdPeriph_Lib_V3.5.0//Libraries/STM32F10x_StdPeriph_Driver/src/stm32f10x_gpio.c: In function 'GPIO_DeInit':
/home/artem/projects/stm32/src/STM32F10x_StdPeriph_Lib_V3.5.0//Libraries/STM32F10x_StdPeriph_Driver/src/stm32f10x_gpio.c:111:3: warning: implicit declaration of function 'assert_param' [-Wimplicit-function-declaration]
   assert_param(IS_GPIO_ALL_PERIPH(GPIOx));
   ^
/tmp/ccvazqC6.o: In function `RCC_HSEConfig':
/home/artem/projects/stm32/src/STM32F10x_StdPeriph_Lib_V3.5.0//Libraries/STM32F10x_StdPeriph_Driver/src/stm32f10x_rcc.c:273: undefined reference to `assert_param'
/home/artem/projects/stm32/src/STM32F10x_StdPeriph_Lib_V3.5.0//Libraries/STM32F10x_StdPeriph_Driver/src/stm32f10x_rcc.c:273: undefined reference to `assert_param'
/home/artem/projects/stm32/src/STM32F10x_StdPeriph_Lib_V3.5.0//Libraries/STM32F10x_StdPeriph_Driver/src/stm32f10x_rcc.c:273: undefined reference to `assert_param'
/tmp/ccvazqC6.o: In function `RCC_AdjustHSICalibrationValue':
/home/artem/projects/stm32/src/STM32F10x_StdPeriph_Lib_V3.5.0//Libraries/STM32F10x_StdPeriph_Driver/src/stm32f10x_rcc.c:338: undefined reference to `assert_param'
/tmp/ccvazqC6.o: In function `RCC_HSICmd':
/home/artem/projects/stm32/src/STM32F10x_StdPeriph_Lib_V3.5.0//Libraries/STM32F10x_StdPeriph_Driver/src/stm32f10x_rcc.c:357: undefined reference to `assert_param'
/tmp/ccvazqC6.o:/home/artem/projects/stm32/src/STM32F10x_StdPeriph_Lib_V3.5.0//Libraries/STM32F10x_StdPeriph_Driver/src/stm32f10x_rcc.c:383: more undefined references to `assert_param' follow
collect2: error: ld returned 1 exit status
Makefile:39: recipe for target 'led.elf' failed
make: *** [led.elf] Error 1
Makefile is a makefile. Nothing surprising.
# path to STM32F103 standard peripheral library
STD_PERIPH_LIBS ?= ./STM32F10x_StdPeriph_Lib_V3.5.0/

# list of source files
SOURCES = main.c
SOURCES += $(STD_PERIPH_LIBS)/Libraries/CMSIS/CM3/DeviceSupport/ST/STM32F10x/system_stm32f10x.c
SOURCES += $(STD_PERIPH_LIBS)/Libraries/STM32F10x_StdPeriph_Driver/src/stm32f10x_rcc.c
SOURCES += $(STD_PERIPH_LIBS)/Libraries/STM32F10x_StdPeriph_Driver/src/stm32f10x_gpio.c
SOURCES += $(STD_PERIPH_LIBS)/Libraries/CMSIS/CM3/DeviceSupport/ST/STM32F10x/startup/TrueSTUDIO/startup_stm32f10x_md.s

# name for output binary files
PROJECT ?= led

# compiler, objcopy (should be in PATH)
CC = arm-none-eabi-gcc
OBJCOPY = arm-none-eabi-objcopy

# path to st-flash (or should be specified in PATH)
ST_FLASH ?= st-flash

# specify compiler flags
CFLAGS = -g -O2 -Wall
CFLAGS += -T$(STD_PERIPH_LIBS)/Project/STM32F10x_StdPeriph_Template/TrueSTUDIO/STM3210B-EVAL/stm32_flash.ld
CFLAGS += -mlittle-endian -mthumb -mcpu=cortex-m4 -mthumb-interwork
CFLAGS += -mfloat-abi=hard -mfpu=fpv4-sp-d16
CFLAGS += -DSTM32F10X_MD -DUSE_STDPERIPH_DRIVER
CFLAGS += -Wl,--gc-sections
CFLAGS += -I.
CFLAGS += -I$(STD_PERIPH_LIBS)/Libraries/CMSIS/CM3/DeviceSupport/ST/STM32F10x/
CFLAGS += -I$(STD_PERIPH_LIBS)/Libraries/CMSIS/CM3/CoreSupport
CFLAGS += -I$(STD_PERIPH_LIBS)/Libraries/STM32F10x_StdPeriph_Driver/inc

OBJS = $(SOURCES:.c=.o)

all: $(PROJECT).elf

# compile
$(PROJECT).elf: $(SOURCES)
$(CC) $(CFLAGS) $^ -o $@
$(OBJCOPY) -O ihex $(PROJECT).elf $(PROJECT).hex
$(OBJCOPY) -O binary $(PROJECT).elf $(PROJECT).bin

# remove binary files
clean:
rm -f *.o *.elf *.hex *.bin

# flash
burn:
sudo $(ST_FLASH) write $(PROJECT).bin 0x8000000
It has three targets:
- “all” target compiles sources
- “clean” remove binaries which were produced by “all” target
- “burn” runs st-flash utility which uploads binaries to a microcontroller. It requires super-user permissions.
Note: the flags seems to be a bit redundant, please also see Ivan’s comment:
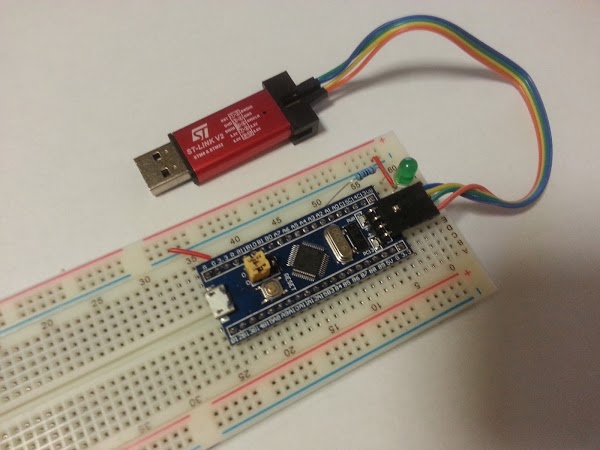
1) in the blue pill, the board shown on the picture, the build in green led is connected to PC13.

2) There is no HW floating point unit in M3 and stm32f103 is M3 (not M4), so these flags should be changed in the Makefile (for the blinking program they are ok, but for some more complex project may bring issues)
SOURCES variable has a list of source files to be compiled. Besides of main.c, it contains a couple of files from STM32 standard peripheral library.
Finally, the code can be build and uploaded to the device with commands like the following:
STD_PERIPH_LIBS=/home/artem/projects/stm32/src/STM32F10x_StdPeriph_Lib_V3.5.0/ make all
ST_FLASH=/home/artem/tools/stlink/st-flash make burn
STD_PERIPH_LIBS variable contains a path to STM32 standard peripheral library which was downloaded before. ST_FLASH variable contains a path to st-flash utility which was built earlier.
You can see something like the following if everything went smoothly:
arm-none-eabi-gcc -g -O2 -Wall -T/home/artem/projects/stm32/src/STM32F10x_StdPeriph_Lib_V3.5.0//Project/STM32F10x_StdPeriph_Template/TrueSTUDIO/STM3210B-EVAL/stm32_flash.ld -mlittle-endian -mthumb -mcpu=cortex-m4 -mthumb-interwork -mfloat-abi=hard -mfpu=fpv4-sp-d16 -DSTM32F10X_MD -DUSE_STDPERIPH_DRIVER -Wl,--gc-sections -I. -I/home/artem/projects/stm32/src/STM32F10x_StdPeriph_Lib_V3.5.0//Libraries/CMSIS/CM3/DeviceSupport/ST/STM32F10x/ -I/home/artem/projects/stm32/src/STM32F10x_StdPeriph_Lib_V3.5.0//Libraries/CMSIS/CM3/CoreSupport -I/home/artem/projects/stm32/src/STM32F10x_StdPeriph_Lib_V3.5.0//Libraries/STM32F10x_StdPeriph_Driver/inc main.c /home/artem/projects/stm32/src/STM32F10x_StdPeriph_Lib_V3.5.0//Libraries/CMSIS/CM3/DeviceSupport/ST/STM32F10x/system_stm32f10x.c /home/artem/projects/stm32/src/STM32F10x_StdPeriph_Lib_V3.5.0//Libraries/STM32F10x_StdPeriph_Driver/src/stm32f10x_rcc.c /home/artem/projects/stm32/src/STM32F10x_StdPeriph_Lib_V3.5.0//Libraries/STM32F10x_StdPeriph_Driver/src/stm32f10x_gpio.c /home/artem/projects/stm32/src/STM32F10x_StdPeriph_Lib_V3.5.0//Libraries/CMSIS/CM3/DeviceSupport/ST/STM32F10x/startup/TrueSTUDIO/startup_stm32f10x_md.s -o led.elf
arm-none-eabi-objcopy -O ihex led.elf led.hex
arm-none-eabi-objcopy -O binary led.elf led.bin
sudo /home/artem/tools/stlink/st-flash write led.bin 0x8000000
2016-07-04T23:11:34 INFO src/common.c: Loading device parameters....
2016-07-04T23:11:34 INFO src/common.c: Device connected is: F1 Medium-density device, id 0x20036410
2016-07-04T23:11:34 INFO src/common.c: SRAM size: 0x5000 bytes (20 KiB), Flash: 0x10000 bytes (64 KiB) in pages of 1024 bytes
2016-07-04T23:11:34 INFO src/common.c: Attempting to write 4040 (0xfc8) bytes to stm32 address: 134217728 (0x8000000)
Flash page at addr: 0x08000c00 erased
2016-07-04T23:11:35 INFO src/common.c: Finished erasing 4 pages of 1024 (0x400) bytes
2016-07-04T23:11:35 INFO src/common.c: Starting Flash write for VL/F0/F3 core id
2016-07-04T23:11:35 INFO src/flash_loader.c: Successfully loaded flash loader in sram
  3/3 pages written
2016-07-04T23:11:35 INFO src/common.c: Starting verification of write complete
2016-07-04T23:11:35 INFO src/common.c: Flash written and verified! jolly good!
That’s pretty much it. Have a next day!